Tuesday, September 29, 2009

Socks For Mr. T

I just have a short blog for you guys today, and a bit of a silly one.

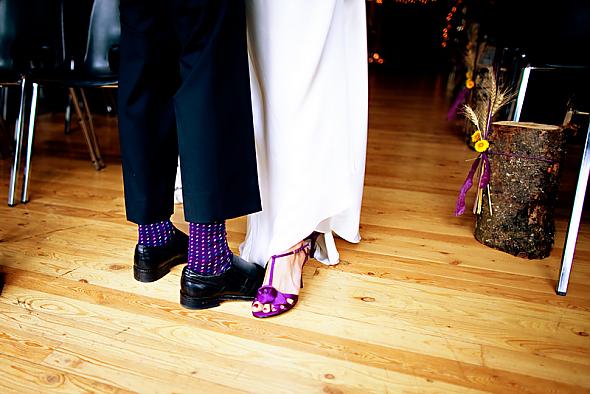
I was browsing the picture gallery over at Weddingbee and came across this photo from tiff7000's wedding.


Totally unnecessary, but now I want to find Mr. T a pair of socks to match my pretty green shoes!!  Not that I hope he's going to look like a dork with highrise pants all night, but I'm sure I could persuade him to pull them up for a quick photo-op.

Let the search begin!

What's your silliest wedding inspiration??

Sunday, September 27, 2009

Wedding Cake Inspiration: Part Two

part 1

I was watching Ace of Cakes earlier today, (best show ever, by the way!) and one cake kept popping up in the background anytime they did interviews.  I took a picture on my phone, and when I got back to school tonight I sketched it out on paper. 

First, the crappy phone picture.

And my interpretation of this beauty...


(click to enlarge)

Here's what I'm thinking about mixing white and ivory in the layers.  The color in this picture would probably be the darker ivory, and then do a lighter ivory as well.

What caught my eye about this cake was the difference in the layers.  All of the pictures I found and shared during part one had layers with even heights.  I really like how this has differing thicknesses.  It will probably work out better this way anyways because it will be a little larger than the pictures in the previous post, and we do have to feed about 300 people.

Until now, I really didn't know what I wanted for my wedding cake.  But now, I think we're good!  I love the sketch, and can't wait to see it in real life. I should probably run it past Mr. T but I'm sure he won't care one way or the other.

Now we just have to pick flavors...that should be the fun part!
Where did you draw inspiration for your wedding cake from??

Saturday, September 26, 2009

DIY: Table Numbers, Part One

Obviously if I'm going to assign my guests to tables, I'm going to need to number those tables so they know where to sit, right?  Duh, we all know that.  So onto the tutorial then.

1.  Cut out squares that measure 6x6" (This way you can get 4 out of a 12x12" paper)

2. Cut out white squares measuring 3.5x3.5" and black squares that are 4x4".  Attach the white square on top of the black square.

3.  Cut out black rectangles that measure 1.5x5.5"

4.  Make a template so that you make white rectangles measuring 1.25x5.25" with each table number centered on it in the font of your choice (I used Scriptina).  Cut them all out.

5.  Attach the numbers to the black rectangle.

6.  Attach the matted number to the top of the large square.

7.  Center the black and white square under it.

8.  Use a 3x3" square as a template for the next step.  Place a black photo corner on each corner.

9.  Center this on the white square.

10.  Then remove the template and it will be ready to accept a 3x3" photo.

For every table number (1-30) I made two of these, so they would be visible from both sides.

I'll show you what I'm planning on doing with these in part 2!

Friday, September 25, 2009

DIY: Bridesmaid Clutch

Here are the clutches I've been hinting at!

I wanted to give my girls something they could carry on the wedding day to put all of their stuff in.  I promise I'm not being a bridezilla and being anal about what they carry or how they match, I just thought they would be really cute, and it gave me something to do this summer.

I came across Mrs. Peep Toe's tutorial on Weddingbee one day, and bookmarked it knowing I would be making them.  I followed her tutorial exactly, but I'll show you my pictures of the steps.

Fabric you will need:
A thicker material if possible for the outside
Something somewhat durable for the inside
Iron on interfacing (I used a pretty thick one)

Step-by-step instructions:
1.  Cut the inside and outside material into 11X18" rectangles..

2. With right sides together, sew along the two long sides and one of the short ends with a 1/4" seam.
3. Cut two pieces of interfacing to the same size, and iron one on each side. (The material is still inside out)
I sewed it to both sides because I wanted a thicker, sturdier clutch.  Depending on your material, and the end result you'd like, you can iron it on to one side, in which case it should be the outside material.
4. Measure about 1/3 of the way down both long sides and make a mark.  Then measure in 2-2.5" at the top.  Connect these lines, and sew along it.

The farther you come in at the top, the more of a sharp flap you will have.
5.  Trim off those corner pieces, turn it right side out, and iron.


6.  At this point I also ironed where it would fold.  So fold the flap down where the angled edge ends.  Then fold the bottom up to meet it.
7.  Turn in the edges of the open flap, iron, and sew shut.

(Iron under)


(Pin shut)

(Sew across)
8.  Turn the bottom inside out, and sew together the two side seams.


9. Turn it back rightside out, and attach your closure.  I'm using a snap instead of a magnetic like Mrs. Peep Toe, because the ones I saw were super expensive!

(Attached to outside of bottom)

(Attached to inside of top)

And here is the finished product with the addition of the cute felt flower I made last week.


Price Breakdown:
The green material is left over from the ring bearer's project, but originally cost $6.00
Black Lining Material = $6.28
Interfacing (5 yards @ 1.79) = $8.95
Snaps (2 packages @ 1.49) = $2.98
Total = $18.21 for 6
Price per clutch = $3.04, not including the flower

Thursday, September 24, 2009

DIY: Boutonniere

Originally I had our florist include all 16 boutonnieres we would need in the initial quote.  So technically, I can afford to pay $7.00 per bout, although when you think about it, $112 for boutonnieres seems a little crazy!

Yesterday while I was wandering through Hobby Lobby, I decided I was going to make my own.  So I bought some white roses, green hydrangeas, and some really cute green stick things that I guess pass as berries?  Anyways, they're super cute as you'll soon see, and the perfect chartreuse green.

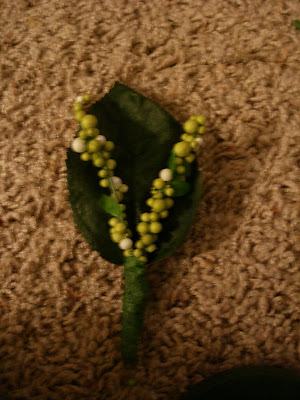
Well my first attempt was a fail.  If you need photographic proof, here it is.

It's not totally bad, I just don't like it.  I posted it here for about a day, and started a discussion about it over on Weddingbee, hoping you guys could convince me to like it.  But it just wasn't happening.  The stem is way to skinny, the "berries" are too long, and it's actually pretty big.  All of those things are fixable, but somehow I just didn't feel like trying with this one.  I just didn't like it enough.

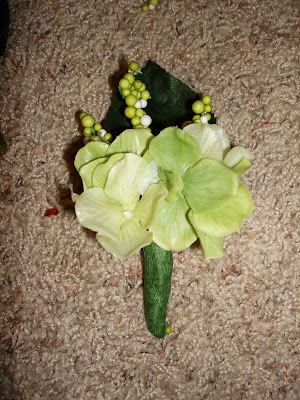
So I started again.  And this time I came up with something I think will work.  I made 5 of them, so I must be pretty pleased with the way they look.  Here is the almost finished product.  (It still needs ribbon wrapped around its base).

As you can see I decided to completely forgo the white rose, and just stick with an all green bout.  This will match the girls' bouquets, so it's better anyways.

How-to:
Step 1.  Start with a leaf, and three pieces of "stick-like things" which I'll refer to as berries from here on out.

Step 2.  Attach one of the berries using floral tape.

Step 3.  Attach the second berry, so that they form a "V".

Step 4.  Attach the third berry, smack dab in the middle.


Step 5.  Add in the bits of hydrangea, filling to your preference.

I wrapped around the base with floral tape a few times just to smooth everything out and make sure it isn't going to go anywhere.

I'm going to add to this either black or white ribbon, I just haven't decided yet.  I'd like to do black, but I think it's going to blend into the tuxes too much, unless I add white to it.  So we'll so what I come up with, and I'll make sure to share with you guys when I do!

Price Breakdown of 5 Bouts:
Hydrangeas (50% off @ 9.99) = $4.99
Floral tape = $1.99
Berries = (50% off @ 2.99) = $1.50
TOTAL = $8.48
Price per bout = $1.70
I currently have enough hydrangeas left to make 3 or 4 more bouts, and the berries will probably get me through all of them.  The tape came two to a pack, so there will be plenty of that.  So when it's all said and done, I'm looking at less than $1.00 per boutenniere, which will save me about $96.00

Funny Wedding Pictures

I should really be working on a three page critique right now, but browsing the internet is so much more fun. I came across Awkward Family Photos and they have an awkward wedding section! Had to share a couple funny ones with you to brighten your day.


DIY: Felt Flowers, Part Two

part 1

I think I found a use for my adorable felt flower! 

I love how it looks on the clutches I made for the girls (which I have yet to blog about, sorry! It's coming soon I promise).  I've known since I made them that they needed something to dress up the front a little, so they weren't so plain, and I think this does the trick.

Now I just have to pump out 4 more flowers.  Oh, how the list is growing!!

Wednesday, September 23, 2009

Love Letters

The best part about being 506.4 miles (I just googled it) away from Mr. T is that we get to utilize the often forgotten form of communication: snail mail.  I just love that moment when you open up your mail box and you find something in there for you that isn't a bill or junk mail.  It brightens my day, especially when it comes from Mr. T.

Yeah, we're kind of sappy like that, and we write each other love letters.  But when I get to missing him horribly I can go back and see his handwriting assuring me that what we're doing is for the best, and that he loves me oh-so-much!

So yesterday I dropped a little something in the mail for him.  It's a continuation of a little tradition I started.  I make him cards, just because and for special occasions.  They're nothing super fancy, in fact it's just a piece of sketch paper folded in half.  But I always draw him a little something on the front, and tell him how awesome he is on the inside.

And the best part is, he saves them, and loves them.

Here's what yesterdays looked like....minus the lovey-dovey details on the inside, cause that's for Mr. T =]

Its inspiration photo, one of my favorite engagement pictures:

Throughout the course of our relationship "Whatever It Takes" has become our motto of sorts.  And now it's even more fitting than ever, because we are doing whatever it takes to have an amazing life together.  He's up in MN working on his masters, and I'm down here, even though I'd much rather not be, finishing up my degree.  So day after day, we keep chugging along, until we don't have to miss each other anymore.

What little traditions or habits do you have with your guy??

DIY: Letters, Part One

Here's a quick post for you while I'm in between classes, and by in between I mean I'm throwing this together in about 5 minutes for you all to enjoy!
I got the letters I ordered from Joann's at the end of last week and I made a little bit of progress on them yesterday.  Remember the post from a couple weeks ago with me being super indecisive about what I wanted to do??  If not here's a refresher.

Well I still don't know what I want to do, but I decided to go ahead and paint them the same way as my chair signs since I had the paint, and no real direction I was heading.

I won't go over the process again, but here's how they turned out.

Not the prettiest picture, what with the newspaper and all, but you get the idea.  I really like how these cracked different from the signs, and you can see more of the black coming through.

I still have no idea what I'm going to actually do with them, but it's a start.  I don't know if I'll hang them from the church doors and then maybe at the front of our table at the reception, or if I'll try and incorporate them with a wreath.  Only time will tell.

But they will make some pretty sweet decorations in our house for after the wedding!

What do you guys think I should do with them??  Any ideas would be greatly appreciated.

DIY: Chair Signs

Last week I shared with you guys the inspiration for the chair signs I wanted to make.  If you remember, these are the ones that I loved the most, but was determined not to spend $30 on.

(etsy seller thebackporchshoppe)

Well my original plan was to make these the next time I went home with all the scrap lumber we have laying around, but I didn't make it quite that far.  Today my horse class got canceled out at the farm because it was pouring, so I decided to make a trip to Hobby Lobby.  Mind you I had absolutely nothing to do for the rest of the day, so I was doing some serious wandering.  Somewhere between deciding to make our boutennieres, wondering if I should pick up screenprinting (You can never have to many hobbies, right??),  and buying a $5.00 album and paper to scrapbook our engagement pictures, I found these really cute wooden plaques.  So I scooped up two of them, along with some paint and came back to my apartment to start another project.

I painted them with black acrylic paint and let them dry completely.
Then I applied a medium, per directions on the back of the bottle, that creates a crackle of whatever you paint over top of it.  (I bought this one from Hobby Lobby and the brand is folkart, but I've also used Walmarts before and it works just as well.)
After the medium dried, I painted on a contrasting top color.

This is literally 2 seconds after I finished painting it.  It was already cracking as I was working my way across it..
I let the paint dry completely and then I painted on my words.


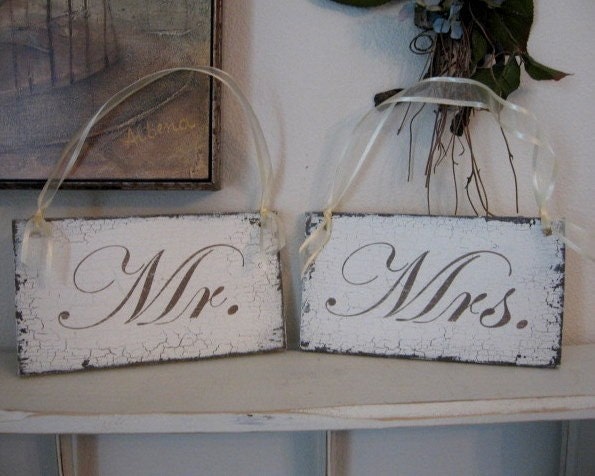
And here they are finished minus a ribbon to hang them with.

This project was so simple and took very little time to actually do, it was just all the drying in between that took awhile.  I really like the shape of these better than the simple rectangles I had in mind, so I don't mind that it cost a little more than free.
Price Breakdown:
2 wooden plaques @ $2.99 = $5.98
Crackle Medium = $1.98
Top color paint = $0.99
Black = previous project
Total: $8.95
I'm probably going to go back and buy two more wood plaques next week when I'm sure they will have their 40% off coupon, and then just return them from my original receipt.  That way it will cut the price almost in half =]  But I was just to antsy to wait and had to get them today!

The only thing left is a ribbon to hang them, and I need to wait til I go home for that since I left my hot glue gun there.

Side story: My roommate walked into the living room and I showed her how cute they were and she asked me, "Aren't your chairs going to be up against a wall?"  I quickly responded with, "Shut up, they're cute!! I know they're totally unnecessary, but they're cute!!"

I realize they serve no purpose, but sometimes the cuteness is all that matters.

What do you think, a green ribbon to match my colors, or a more neutral one to match the signs??  How are you saving your seats?

Monday, September 21, 2009

My Inspiration Board

I just realized that I've been sharing all these posts and projects with you guys, but I never actually showed you where my head was at in all of this planning.  So I put together a little board containing all my favorites from when I started my "research."  Research probably shouldn't be in quotes, because that's pretty much what it was.  I'd sit down every day at the computer and just google and google and google until I couldn't google anymore.  And then I'd do it again the next day.  I still do it frequently when I'm looking for inspiration.

Row 1 from l-r: 1, 2, 3, 4
Row 2 from l-r: 1, 2, 3, 4, 5
Row 3 from l-r: 1, 2, 3, 4
(I can't find all of the sources now, and I've been looking for like an hour, but I'll update them as I find them!)

So that's kind of what is guiding me at the moment.  It changes frequently, sometimes from day to day, but overall, this is what I'm going for.


Sunday, September 20, 2009

The Dresses That Weren't

Well I'm back from a fabulous weekend visiting Mr. T in Minnesota!!  It was so amazing to see him again after more than a month, and I already miss him.  We got to hang around our house, and his mom and I and many of his relatives went to his first home game of the season.  They lost, but the brand new stadium was awesome.  All in all, it was a great weekend, and I can't wait until I can go back.  I love you Mr. T!

I got back pretty late, but since I've been away all weekend, I figured I'd share with you a post I've had written for a few days now so I don't have to do anything tonight!!  It's about the dresses that weren't.

I know I haven't told you much about my dress yet, but it is ordered!! I found it back in May and it should be in sometime in the next few months.  I absolutely love it and I promise I'll show it to you soon (as long as I have Mr. T's word that he won't peek), but in the meantime here are some of the dresses that I didn't love enough...and some of them I didn't love at all!

We started out at David's Bridal up near Chicago.  I'm kind of iffy as to what to say about the service.  The lady that was appointed to me did fairly well, she brought me dresses as I asked for them and was around to zip me up most of the time.  But one of my bridesmaids was also dress shopping for her wedding and her lady disappeared after the first 2 minutes and hardly ever came back.  So it wasn't horrible, but not the greatest either.  Here's what I found:


Nothing made me catch my breath when I looked in the mirror, and I didn't get that feeling of a dress being "the one" like I was hoping for.  So we moved on.

We went to Eva's Bridal next which was right down the road.  We got to pick out all the dresses we wanted to try on, and then we were put in huge dressing rooms which was really nice.  We kind of fended for ourselves after that, but occasionally a lady would be there to help tie or zip you up.  What really sucked about this place was that they wouldn't let you take a picture of the dress until you actually bought it!  So my maid of honor AKA my seester and I were sneaking pictures in the dressing room.

This is the style dress my heart was originally set on, but I quickly realized it totally doesn't work for me. There's just something about being super short and a huge puffy skirt that don't go so well together, who would have thought?!

There was one other dress that I actually thought was "the one" and I just couldn't get out of it, but we somehow managed not to get a picture of it.

This was the dress I really thought I loved and I needed my mom to see it because her opinion is really important to me.

So that was my first weekend of dress shopping up in Chicago.  Then I tried again at a store down here in Champaign called Michelle's Bridal.  Absolutely awesome service, and this is ultimately where I ordered my dress from.

I tried on this Maggie again because I realized after looking at the picture of myself in it from the store in Chicago that I really liked it.  I really recommend looking at pictures of yourself in the dresses to see what they look like before you make any decisions.

I tried on the Victoriana again for my mom to see, and she hated it! And after seeing myself in the dresses from the last trip with the huge skirts I realized it really wasn't that flattering. (I managed to not get a picture again! I would still really like to see what I looked like in it.) 

So then I started trying on some more styles to figure out what was going to work.


So there you have it....all the losers!  I'd tell you the names and who they were by, but I honestly don't have a clue!! I just picked and chose dresses off the racks that I thought were pretty.  One of these days I'll show you the winner, the dress I'm absolutely in love with, and feel like a total princess in =]  Cross your fingers that Mr. T will keep his eyes away.

What about you guys, how many dresses did you fall in and out of love with until you found "the one"?

Related Posts with Thumbnails