Showing posts with label gift for your groom. Show all posts

Tuesday, September 15, 2009

My Current Labor of Love: Part 2

A couple days ago I gave you a brief tease as to what I'm making Mr. T for our one-year anniversary (if I can keep it a secret long enough!)  And even though it's not done yet, I thought I would share with you the progress I'm making so far.

If I can't tell him, I might as well tell all of you right?!!  Maybe that will control the urge I have to tell him all about it!

So Mr. T, if you're reading this....hit the road.  I'm sure you have some grad school homework to work on, right??  Love you!

As you might have figured out, I'm working on a t-shirt quilt.  I took all of his tshirts from his days of playing football at Illinois, and cut them up!!  He had them sitting in a pile in his room, not being worn, because he didn't want to ruin them.  I ran this past him before, and he even knew I cut them all up, but we had both forgotten about them since then.

So instead of him wearing his tshirt to threads, I'm preserving them in a quilt we can use for years to come.  (Cheesy, right? Don't worry...I know).

Step 1:  Cut your tshirts.  I made these into 14" by 14" squares.
The quilt I'm making is 4 squares across, by 5 squares down, so I used 20 shirts.
Step 2:  Draw out your design on paper...trust me, it helps!!
By laying it out on paper, and color coding my pieces, it helped me figure out what I would need.
So as you can see (click on it to enlarge) I needed 15 pieces that measure 14" by 5 1/2".  Then I also needed 16 pieces measuring 14 1/2" by 5 1/2" of the same color.  For the little squares in between, I needed 12 pieces measuring 5 1/2" by 5 1/2" and those are done in a different color.  I'll talk about the outside later, because I haven't made it that far yet in the project.
Step 3:  Cut out all the pieces I mentioned above.  The way I found my measurements was this:
For the vertical pieces: make them the same length as the tshirt square (14").  For the width, choose it to fit your style (5"), and add 1/2" for seam allowances (5 1/2").
For the horizontal pieces:  Make them the same width (5 1/2") and add 1/2" to the width of your square (14 1/2").
For the squares:  These should measure the same width as the rectangles (5 1/2")
Step 4:  Start by sewing across your pattern vertically.  Sew one vertical piece to the right side of the first tshirt square with a 1/4" seam allowance.  Sew the other edge of the vertical piece to the left side of the 2nd tshirt square.
Continue piecing it together, working across the pattern.
For each horizontal row you should have 4 tshirt squares and 3 vertical pieces (blue).  So with my pattern, I had 5 strips when I was finished.  Make sure to iron open all of your seams before moving on!
Step 5:  Piece together the rows that will go in between the tshirt rows.  Do this in the same way, sewing a horizontal piece, to a square, to a horizontal piece to a square, etc.  Make sure you use the same 1/4" seam allowance.
Following the pattern, you should have a strip of 4 horizontal pieces and 3 squares.  There will be 4 of these strips.  Make sure to iron open all of your seams before moving on!!
Step 6:  Pin together one tshirt strip to a blue and orange strip.  You want to make sure that your seams match.  The orange square should match up with the vertical blue piece.  Pinning here is crucial so that your intersections come out nice and even on the front side. 
Notice the ironed open seams....it makes for easier line up. 
If you place your pin directly through the seam into the second seam, they tend to line up well.
Step 6:  Sew across with a 1/4" seam allowance.
Here's what your corners should look like if you do it correctly.
Step 7:  Continue doing this until you have all of the strips sewn together.
My puppy dog Pepper made it into the picture!
So there is the first part of the face of the quilt.  I still need to sew the outside edges before it can be attached to the back.  But there are only so many hours in one weekend, and I had to come back to school.
I'll share the next steps with you as they happen!!

Saturday, September 12, 2009

My Current Labor of Love

I always love coming home from school for the weekend because I get to work on fun projects!! My sewing machine is here along with a lot of other things I don't feel like hauling back and forth to school. 

So of course, last night I was up late working on a little something for Mr. T

(This would be your cue to scoot love!!)

This is a project I started working on a few months ago and then never got around to finishing.  I think it will be the perfect gift to give to him for our one year anniversary coming up in November.  That is, if I can keep it a secret long enough.  I'm sure I'll want to tell him or show him as soon as it is done.

I can't show you what it is yet, because a.) it's not done, and b.) I can't upload any pictures to the computer while I'm at home.

But I will give you a little teaser as to what I'm making....

It involves about 20 of these....
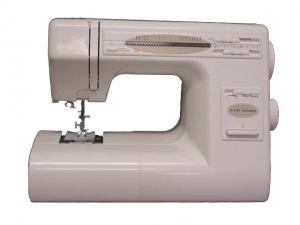
Lots of time at one of these....
And incorporates this!
So there ya go....I'm sure you've probably figured out what I'm working on, but I'm going to wait to clue you in until it's all finished!!
Do any of you find it hard to keep a secret from your guy when you have a really good gift??!

Saturday, August 29, 2009

The Perfect Gift For Your Groom

The time has come for a little self-advertising.
Whether you call it cornhole, or bean bags, most of you probably either love it, or have never heard of it.  For those of you who have, imagine gifting your new hubby with a set customized to his favorite sports team or work logo.  They're perfect to take camping or tailgating, and just as nice to have at home for a get together with friends.

You may be able to find him a blank set somewhere, slap a decal on it and call it a day.

But I can offer you a custom, hand-painted set.  That makes for limitless possibilities.  You're not just stuck with the major sports teams that you can find decals for.  With my boards, we can create anything you'd like.  A highschool mascot, a police force logo, a Miller Lite logo, you name it and I'll paint it.

My boards measure 41"x24" on top and the sides are 4" deep.  The legs fold in and out, so you're not transporting big bulky sets.  First they are painted with two coats of water-repellent paint.  Then the image is hand painted, and three coats of sealant is applied.  You will never have to worry about the design getting scratched off, or the wood rotting from rain.
As you can see the legs fold down, and can be put back for transport/storage.

Your custom set will also include 10 bean bags.  The game only requires 8, so this includes an extra for each color should something happen.  They are made out of heavy duty duck-cloth canvas and weigh one pound each.  They are made in two colors that complement the board.

You pick the background paint color, the design you want, and the color of the bags.
These were made for a 21st birthday and everyone signed the back in permanent marker.
Right now these are only available to those of you in Illinois, southern Wisconsin, and western Indiana because I will deliver them to you.  Unless you are willing to pay for shipping, but I have no idea how much it would cost.
The cost of this custom set, including the bean bags is $175.00
Please let me know today if you're interested!!
*All images above taken by me.
*All sets above hand-painted by me.
(To date I have made: Packers, Brewers, Badgers, Illini Chief Head, Lightning McQueen and Tow-Mater from Disney's 'Cars', Florida Gators)
Related Posts with Thumbnails