
(etsy seller thebackporchshoppe)
Well my original plan was to make these the next time I went home with all the scrap lumber we have laying around, but I didn't make it quite that far. Today my horse class got canceled out at the farm because it was pouring, so I decided to make a trip to Hobby Lobby. Mind you I had absolutely nothing to do for the rest of the day, so I was doing some serious wandering. Somewhere between deciding to make our boutennieres, wondering if I should pick up screenprinting (You can never have to many hobbies, right??), and buying a $5.00 album and paper to scrapbook our engagement pictures, I found these really cute wooden plaques. So I scooped up two of them, along with some paint and came back to my apartment to start another project.

I painted them with black acrylic paint and let them dry completely.
Then I applied a medium, per directions on the back of the bottle, that creates a crackle of whatever you paint over top of it. (I bought this one from Hobby Lobby and the brand is folkart, but I've also used Walmarts before and it works just as well.)
After the medium dried, I painted on a contrasting top color.

This is literally 2 seconds after I finished painting it. It was already cracking as I was working my way across it..
I let the paint dry completely and then I painted on my words.


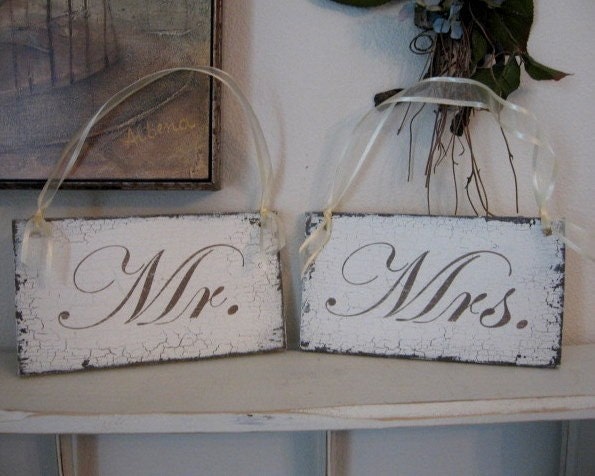
And here they are finished minus a ribbon to hang them with.
This project was so simple and took very little time to actually do, it was just all the drying in between that took awhile. I really like the shape of these better than the simple rectangles I had in mind, so I don't mind that it cost a little more than free.
Price Breakdown:
2 wooden plaques @ $2.99 = $5.98
Crackle Medium = $1.98
Top color paint = $0.99
Black = previous project
Total: $8.95
I'm probably going to go back and buy two more wood plaques next week when I'm sure they will have their 40% off coupon, and then just return them from my original receipt. That way it will cut the price almost in half =] But I was just to antsy to wait and had to get them today!
The only thing left is a ribbon to hang them, and I need to wait til I go home for that since I left my hot glue gun there.
Side story: My roommate walked into the living room and I showed her how cute they were and she asked me, "Aren't your chairs going to be up against a wall?" I quickly responded with, "Shut up, they're cute!! I know they're totally unnecessary, but they're cute!!"
I realize they serve no purpose, but sometimes the cuteness is all that matters.
What do you think, a green ribbon to match my colors, or a more neutral one to match the signs?? How are you saving your seats?


WOW... Great job!
ReplyDeleteI say do the green ribbon. What made our seats different is that we had black sashes on ours. Our guests only had the white chair covers.
Those are awesome - I'm SO going to have to try this! Thanks for showing how easy it can be!
ReplyDeleteJust the ONE picture your photographer will take of you two from behind with the signs will make it worth it! :)
ReplyDeleteThanks guys!! Good call Miss Mojito, that just prompted me to start a list of shots she needs to take, don't want to risk forgetting it!
ReplyDeleteCan I ask a question? Did you freehand the words or did you use a stencil? (and if so, acrylic paint or spray paint?) Thanks for helping out a non-crafty DIY-bride!! :)
ReplyDelete@ Kaikoso... I did freehand the words, but you could probably blow them up on your computer and cut around them and then trace around it onto the wood. I just used cheap black acrylic paint. If you have any other questions just let me know!!
ReplyDeleteOh my goodness - I can't believe you made these yourself, they look amazing! I'm definitely going to have to copy this project! :)
ReplyDeletewhat color did you use for the top coat? Antique white?
ReplyDelete@anonymous...I'm not sure what the color was called and I dont have it here with me. It was just one of those small acrylic tubes you can find at Walmart, Hobby Lobby, Michaels, etc. It was an offwhite kind of creamish color.
ReplyDeleteHope that helps!!
I know I'm late to the party, but these are AMAZING!! I actually like them better than the original. Great job :)
ReplyDeleteWow I love these! they would be perfect for my wedding! Great job!! I'm going to try it out and let ya know how it goes! :-)
ReplyDeleteI absolutely love these!! I was thinking of doing something similar to this and my one of my wedding colors is an eggplant purple color.
ReplyDeleteDo u think it would work to use eggplant instead of the black acrylic you used as the first coat? Do you think that would look good??
Thanks for your help, I love all your DIY projects!
@Katie...
ReplyDeleteI definitely think you could do an eggplant first instead of black. I actually just did some large letters in this same technique for my cousin's wedding and I used a dark purple first and then a creamy ivory color second...it turned out great!